Workspace tour
This page walks through the screens you see when you use Genie: the projects home, the genome picker, and the project workspace. It names each control as it appears in the app so that the rest of the documentation can refer to it.
Genie ships in more than one build. In the desktop build the assistant (the chat panel and Analysis mode) is on by default. The local web app turns it on only when it is configured to, and the cloud web build shows projects and the genome browser without the assistant. Where a screen differs without the assistant, this page says so. See Assistant overview for how the assistant is enabled.
Projects home
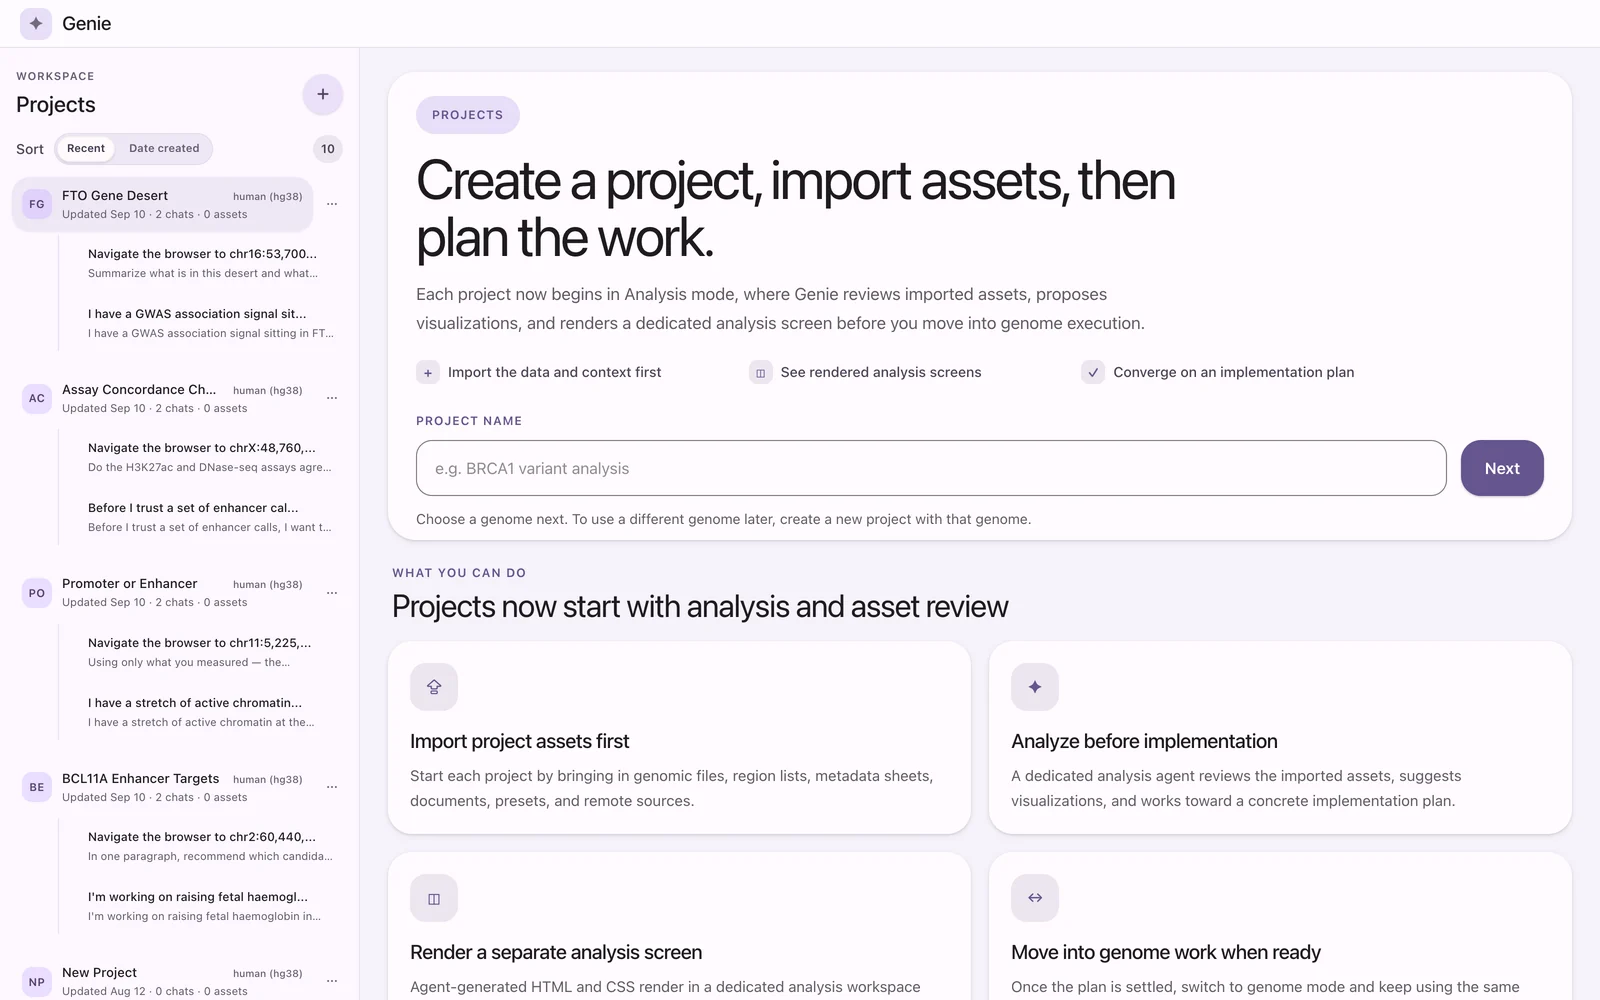 The projects home with the assistant on.
The home screen has two parts.
Project list (left). Under Workspace / Projects you see every project, with a counter of how many there are. Each row shows:
- a one- or two-letter badge (initials of the title) and the project title,
- the project's genome (for example
human (hg38)), - when it was last updated (or created), and how many chats and assets it has,
- previews of up to two recent chats, with a "+N more chats" line if there are more.
Use the Sort toggle to order projects by Recent or Date created. Click a row to open the project. When focus is not in a text field, ↑ and ↓ move the selection through the list and Enter opens the selected project. The ⋯ button on a row opens a small menu with Rename and Delete; see Projects and genomes.
New-project area (right). The Project name field (placeholder e.g. BRCA1 variant analysis) and the Next button start a new project. The helper line under the field reads "Choose a genome next. To use a different genome later, create a new project with that genome." Below the form, What you can do summarises the workflow, and Example projects offers titles you can copy into the name field with Use this. The + button next to Projects in the sidebar does the same thing as Next.
Creating a project and choosing a genome
- Type a name in Project name and click Next (or press Enter).
- The genome picker opens.
- Click an assembly name in one of the species cards.
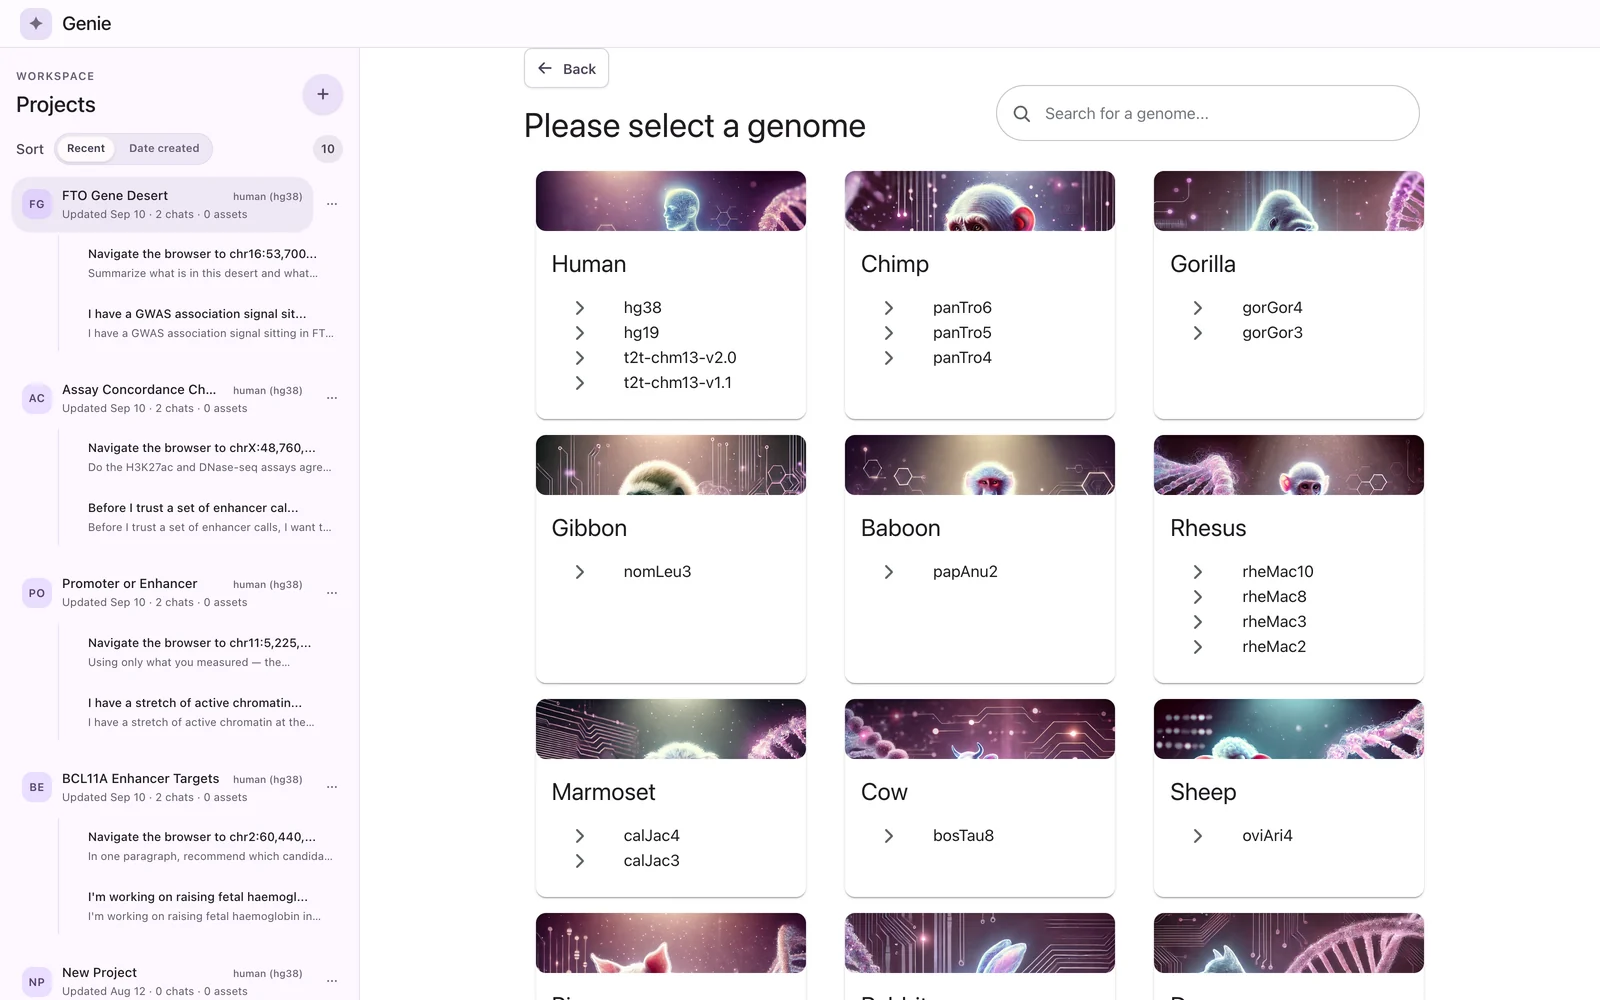 The genome picker. Each card lists the assemblies offered for that species.
The picker is titled Please select a genome. Type in Search for a genome... to filter by species name or assembly name, or click Back to return to the name field. The picker offers 57 assemblies in 30 species groups; the full list is in Genome assemblies.
As soon as you pick an assembly, Genie creates the project and opens it. With the assistant on, a new project opens in Analysis mode; without the assistant it opens straight into the genome browser. The genome is fixed for the life of the project.
The project workspace
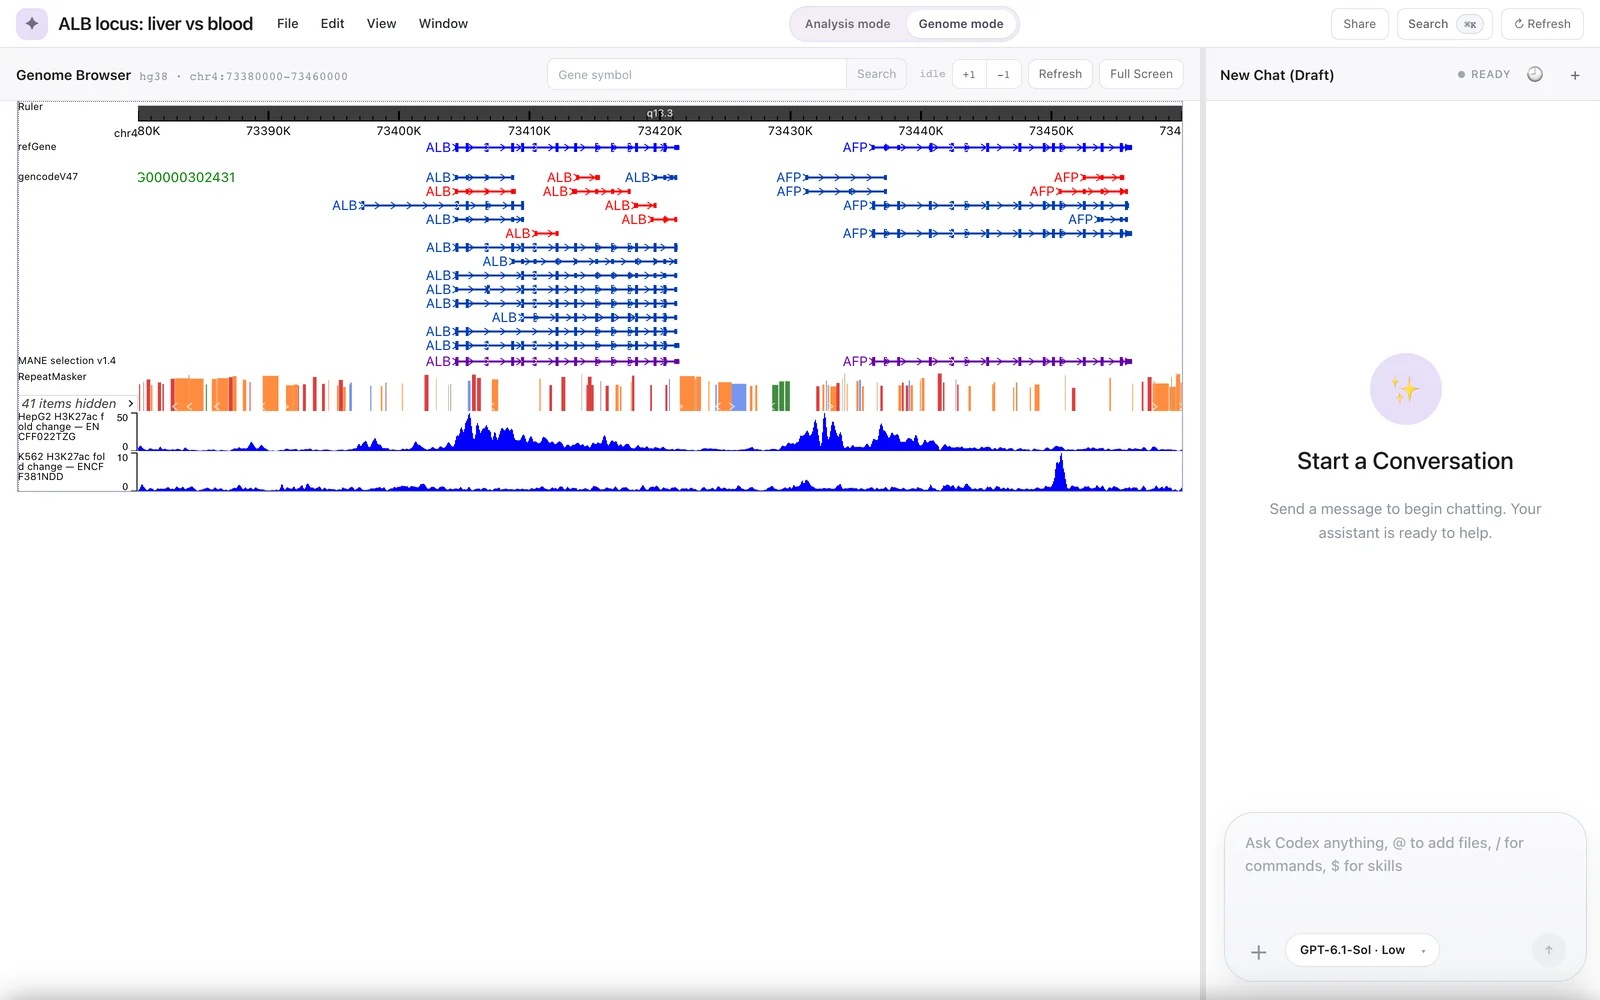 A project in Genome mode. The browser shows the hg38 default tracks plus two ENCODE signal tracks that the assistant loaded.
Top bar
From left to right:
| Element | What it does |
|---|---|
| Genie mark | Returns to the projects home. |
| Project title | Click it to rename the project in place. The current name is pre-selected; Enter saves and Esc cancels. |
| File, Edit, View, Window | Application menus. See Menus below. |
| Analysis mode / Genome mode | Switches between the two workspace modes. Shown only when the assistant is on. |
| Share | Opens the sharing dialog. See Export and sharing. |
| Search ⌘K | Opens the command palette. |
| ↻ Refresh | Reloads project assets, analysis state, chat sessions and the model list. |
Genome browser panel (left)
In Genome mode the left side holds the genome browser. Its header shows Genome Browser, the genome id and the current locus (for example hg38 · chr4:73380000-73460000), followed by:
- the Gene symbol box and Search button,
- a status word (for example
idle), - the zoom buttons +1 and -1,
- Refresh, which reloads the browser state from the project,
- Full Screen, which opens the same browser in a large overlay with its own gene search, zoom buttons and Close.
Below the header, tracks are drawn by the eg3 engine (the third-generation WashU Epigenome Browser). Drag inside the tracks to pan. Right-click a track for its menu. Details are in Navigation and Track settings.
The divider between the browser and the chat panel can be dragged. By default the browser takes 75% of the width; View → Reset Panel Split restores that. The split is remembered in your browser's local storage.
Chat panel (right)
When the assistant is on, the right side holds the chat panel:
- The header shows the chat title. A chat that has not been sent yet is labelled New Chat (Draft). Next to it are the chat's status (for example READY), a history button that lists the project's chats for the current mode, and a + button that starts a new chat.
- An empty chat shows Start a Conversation with "Send a message to begin chatting. Your assistant is ready to help."
- The composer at the bottom has the placeholder "Ask Codex anything, @ to add files, / for commands, $ for skills". Enter sends; Shift+Enter adds a new line.
- The + button in the composer tags project assets to the next message.
- The model and reasoning-effort selector (shown as, for example,
GPT-6.1-Sol · Low) chooses the model and effort for the chat. The models listed come from the local agent runtime.
What the assistant can do is covered in the Assistant section.
Genome mode and Analysis mode at a glance
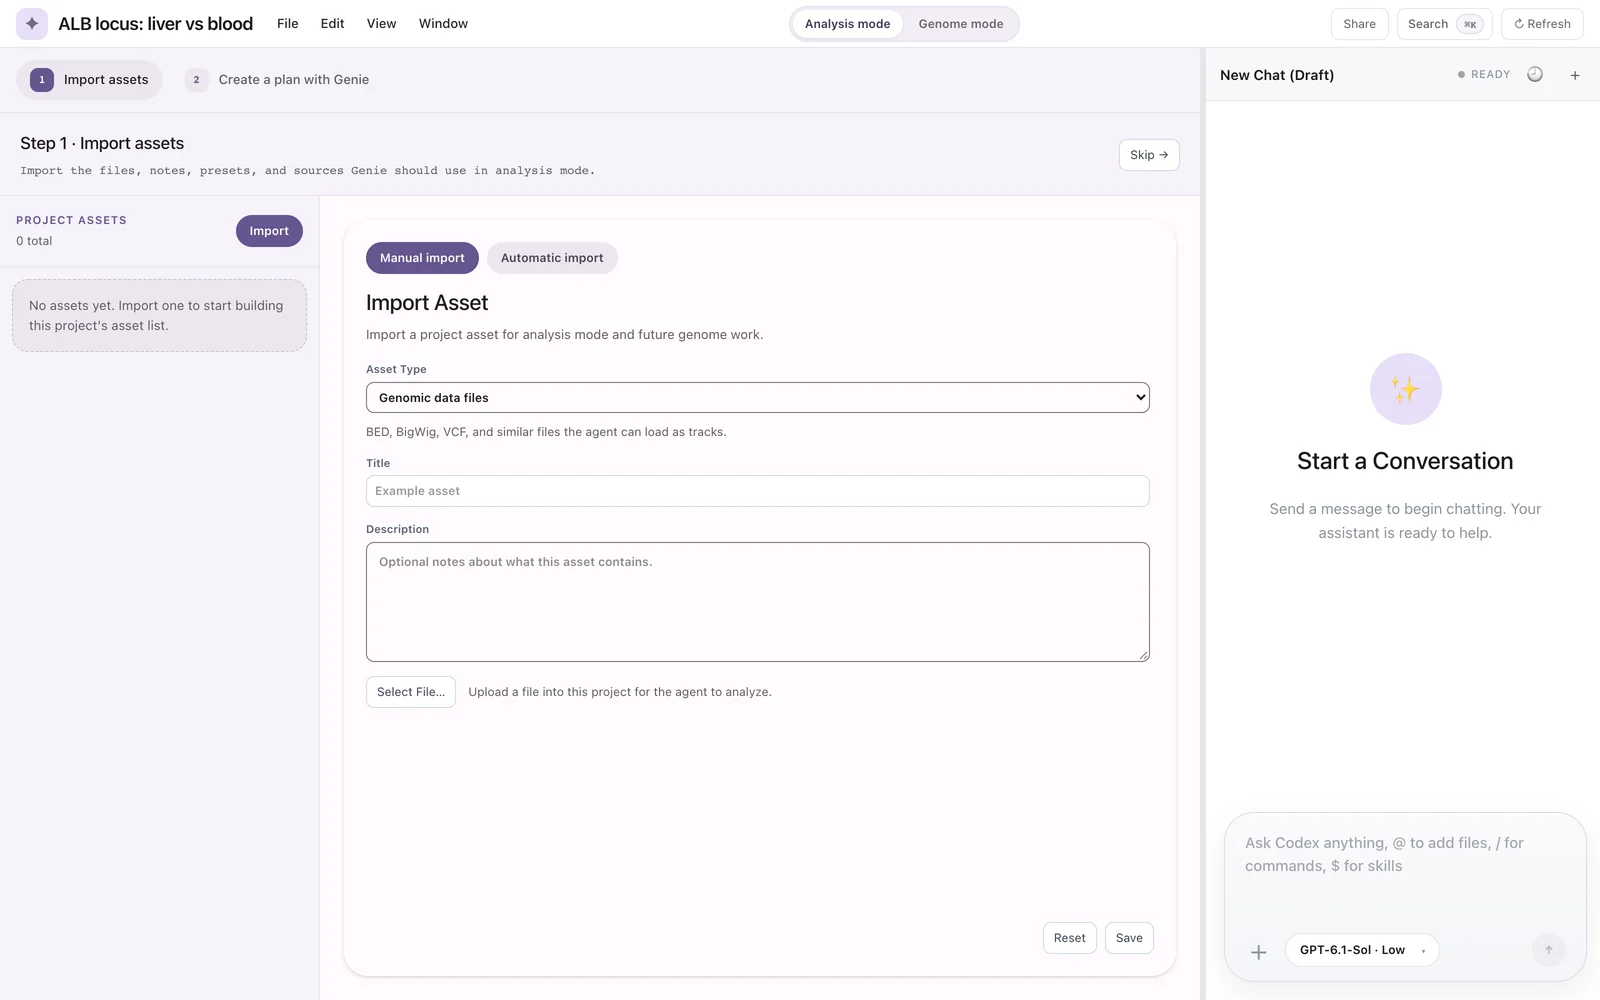 Analysis mode, step 1 (Import assets).
| Genome mode | Analysis mode | |
|---|---|---|
| Left panel | Genome browser | Two steps: 1 Import assets and 2 Create a plan with Genie (Discovery Studio) |
| Chat tools offered | Genome tools: navigation, track loading, measurements, ENCODE search | Asset and planning tools, plus persistent Studio outputs |
| Typical use | Look at a region, load data, measure signal | Collect project files and context, write a plan or report |
| Route | /projects/:projectId | /projects/:projectId/analysis |
Each chat is offered the tools of one mode only. Switch with the top-bar toggle, View → Switch to Analysis Mode (Cmd+1) or View → Switch to Genome Mode (Cmd+2). Both modes work on the same project, so assets, browser state and saved outputs are shared. See Modes for the full comparison, including the separate Asset import mode.
Menus
The menus list the same actions as the command palette, with their shortcuts. Menu entries for the genome browser (track sheets, remote tracks, image export) appear only in Genome mode.
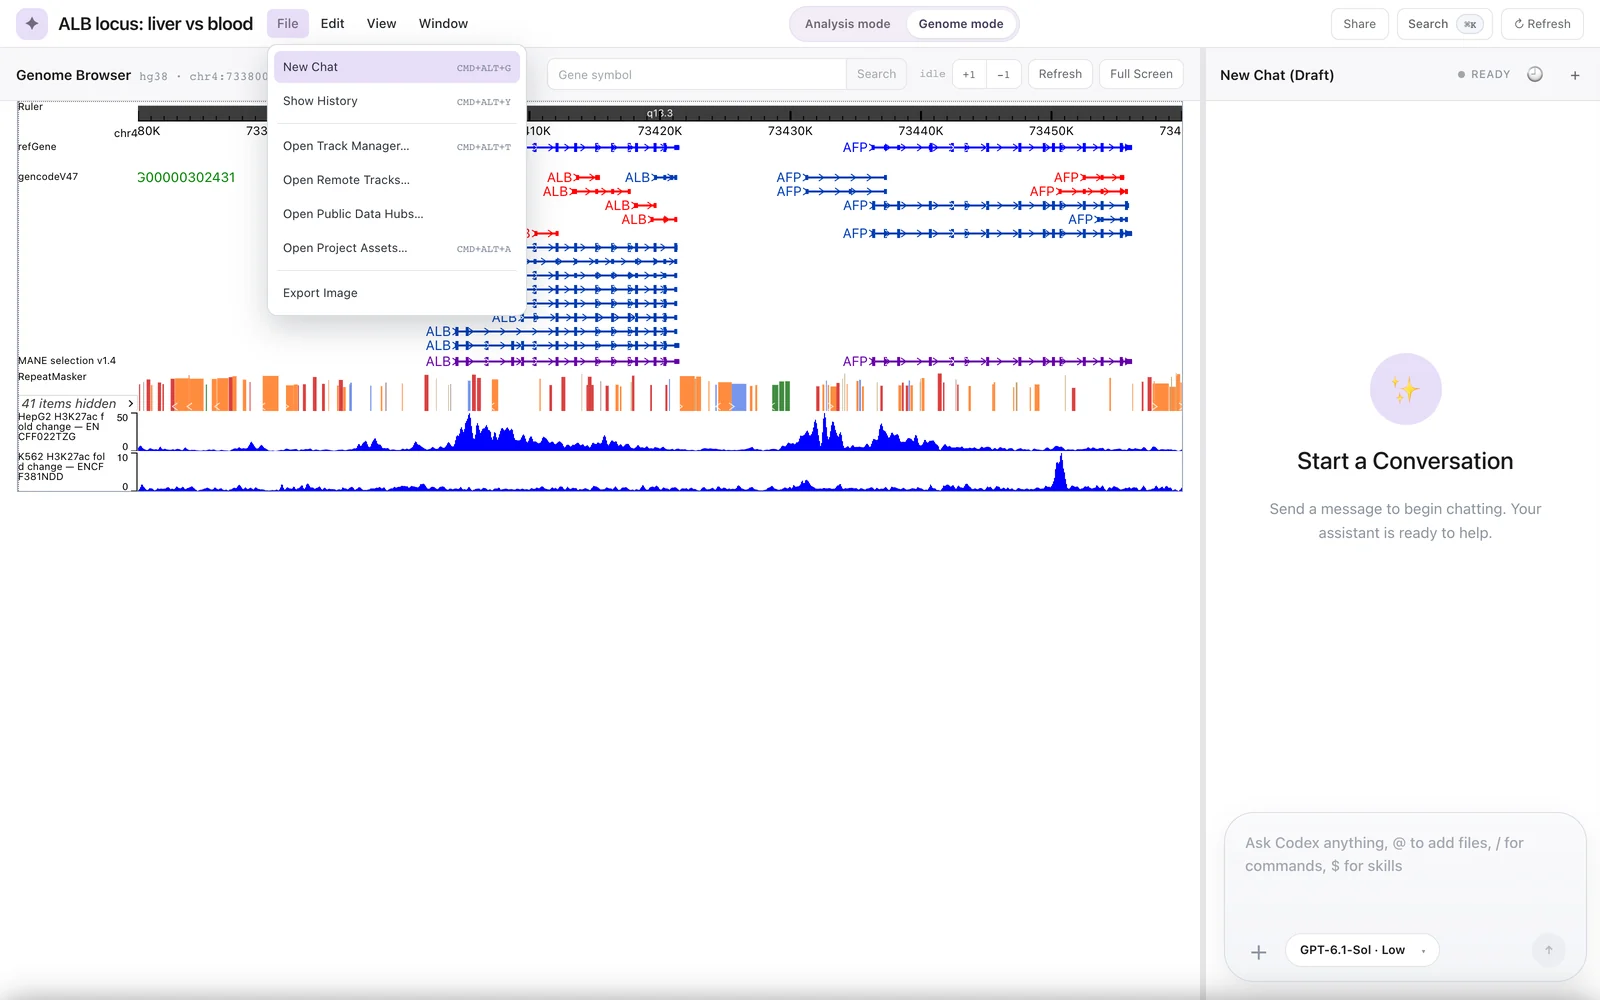 The File menu in Genome mode.
| Menu | Items |
|---|---|
| File | New Chat, Show History, Open Track Manager…, Open Remote Tracks…, Open Public Data Hubs…, Open Project Assets…, Export Image |
| Edit | Rename Session, Delete Session |
| View | Switch to Analysis Mode, Switch to Genome Mode, Command Palette…, Show Track Manager, Show Public Data Hubs, Reset Panel Split |
| Window | Refresh Data, Close Track Manager Sheet, Close Public Data Hubs Sheet, Close Remote Tracks |
Without the assistant, the chat and mode entries (New Chat, Show History, Rename Session, Delete Session, the two mode switches and Reset Panel Split) are not shown.
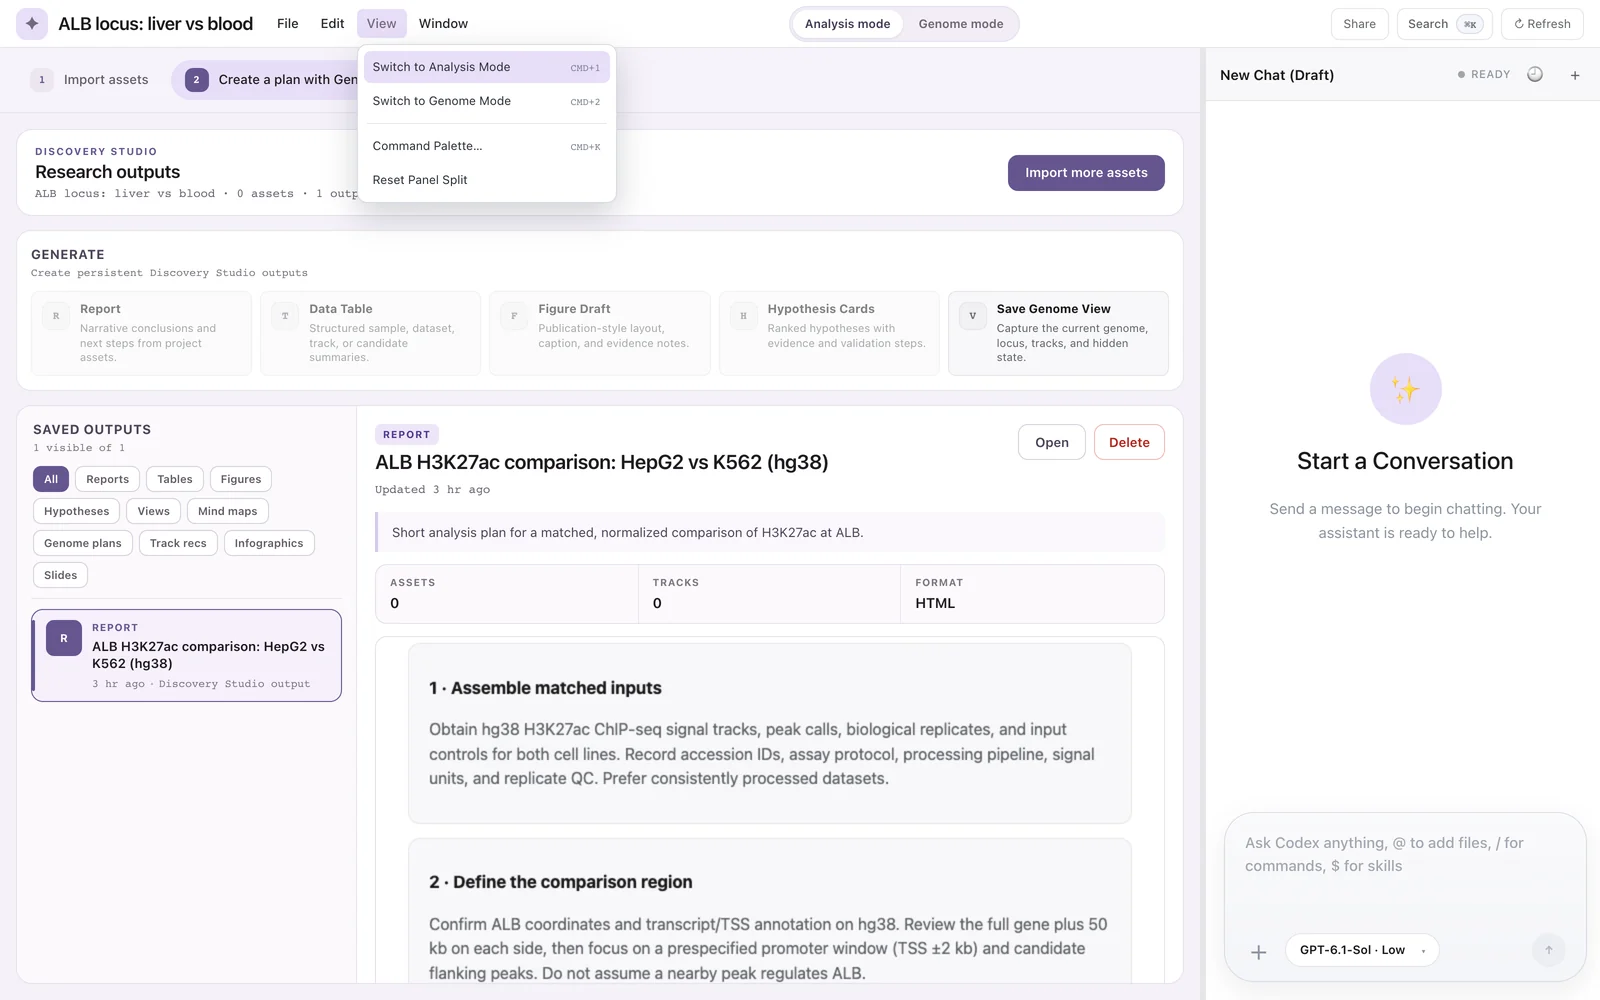 The View menu in Analysis mode, where the browser entries are hidden.
With a menu open, ← and → move between menus, ↑ and ↓ move between items, Enter runs the highlighted item and Esc closes the menu. All shortcuts are listed in Keyboard shortcuts.
Command palette
Press Cmd+K or click Search in the top bar.
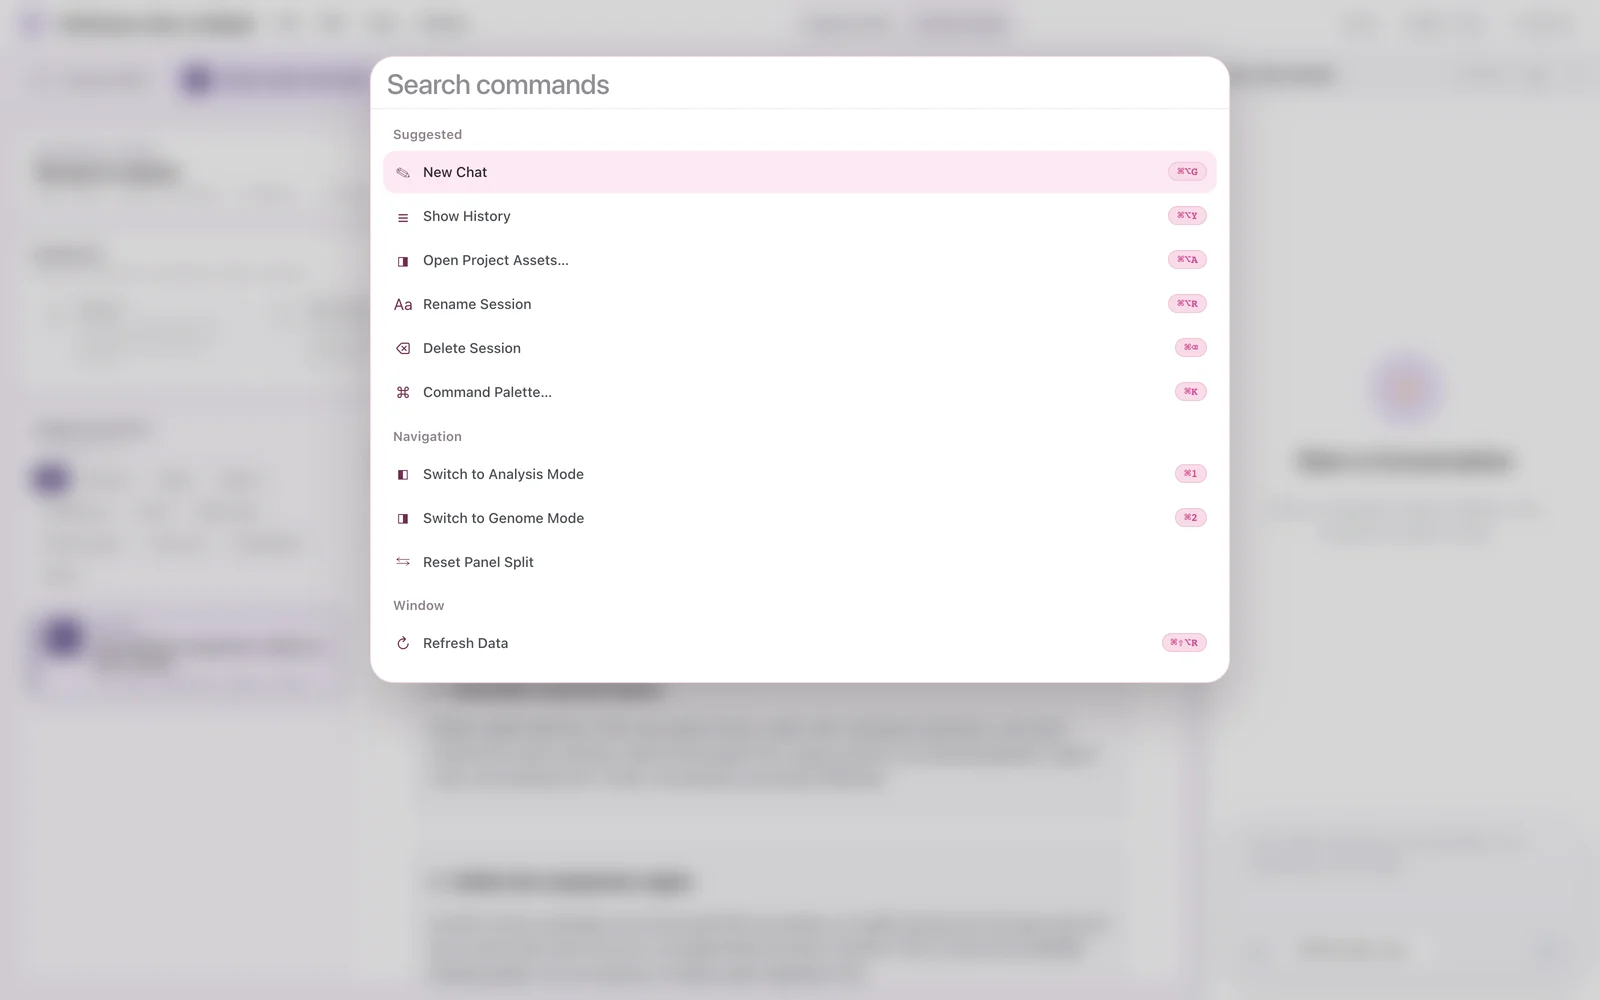 The command palette in Analysis mode.
Type in Search commands to filter. Commands are grouped under Suggested, Navigation and Window, each with its shortcut on the right. Use ↑ and ↓ to move, Enter to run and Esc to close. While the palette is open, other shortcuts are ignored.
Sheets and dialogs
These panels open over the workspace. All except Project Assets are available only in Genome mode. Each closes with its Close button or Esc.
| Panel | How to open | Purpose |
|---|---|---|
| Track Manager (bottom sheet) | File → Open Track Manager… (Cmd+Alt+T) | Reorder, show, hide and remove tracks; add default tracks; edit name, height and options. See Track settings. |
| Public Data Hubs (side sheet) | File → Open Public Data Hubs… | Load public track hubs and add their tracks. See Adding tracks. |
| Remote Tracks (dialog) | File → Open Remote Tracks… | Add a track from a file URL. See Adding tracks. |
| Track Inspector (bottom sheet) | Right-click a track → Inspect track… | Read-only details about a track and its last data request. |
| Project Assets (dialog) | File → Open Project Assets… (Cmd+Alt+A) | Import and review project assets. See Project assets. |
The Track Manager sheet has a drag handle: drag it up or down to resize the sheet, or drag it down to dismiss it.
Next steps
- Navigation: moving around the genome.
- Adding tracks: default tracks, public hubs and remote files.
- Assistant overview: what the chat panel does.