Project assets
Project assets are the files and sources you collect for a project: data files, gene or region lists, sample sheets, notes and protocols, track presets, and links to remote data. The assistant can list and read them in Analysis mode, and you can attach them to chat messages. Assets are stored with the project; they are separate from the tracks shown in the genome browser.
Opening the asset catalog
There are three ways in:
- File → Open Project Assets… or Cmd+Alt+A, in either mode. This opens the Project Assets dialog (on the Analysis-mode step 1 screen it opens the import form in place instead).
- In Analysis mode, step 1 Import assets shows the same catalog in the main panel.
- In Analysis mode step 2, the Import more assets button returns to the catalog.
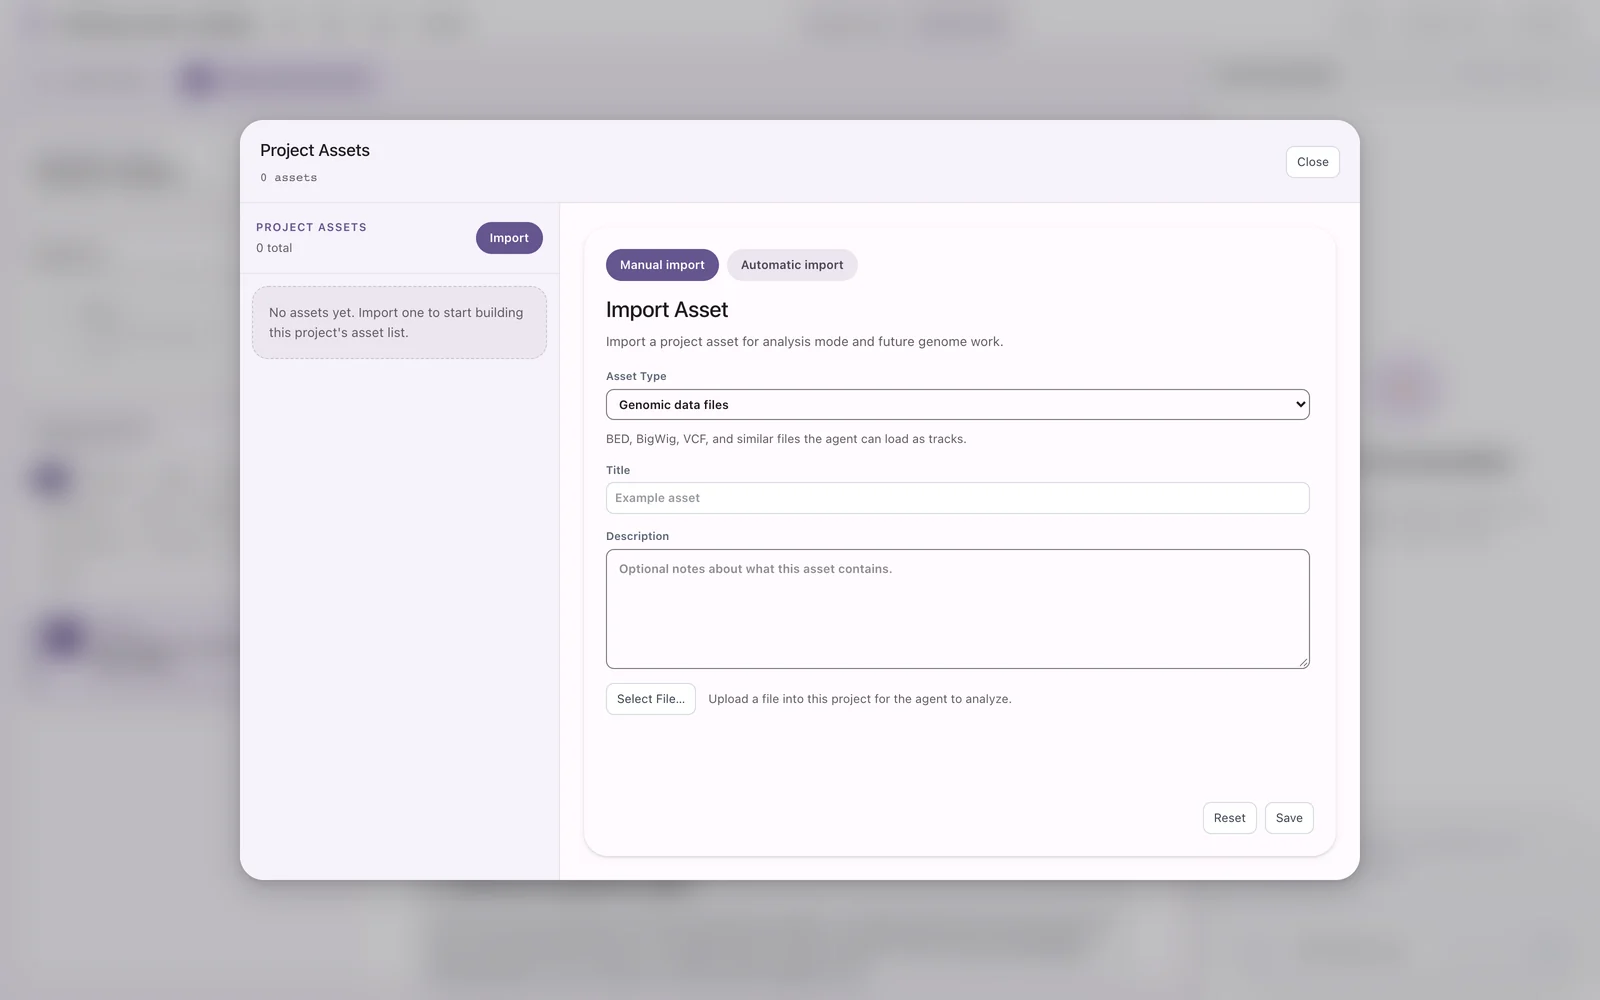 The Project Assets dialog for a project with no assets yet.
The dialog has a list on the left (Project Assets, with the total and an Import button) and an editor on the right. When the project has no assets, the list says "No assets yet. Import one to start building this project's asset list." Close the dialog with Close or Esc.
Asset kinds
Every asset has one of seven kinds. Choose it in the Asset Type drop-down; the line under the drop-down describes it.
| Asset Type (label) | Kind id | Description shown in the app |
|---|---|---|
| Genomic data files | genomic-data-file | BED, BigWig, VCF, and similar files the agent can load as tracks. |
| Region / gene lists | region-gene-list | Curated genes or coordinates to navigate and annotate. |
| Sample / metadata sheets | sample-metadata-sheet | CSV or TSV mapping samples to conditions or context. |
| Reference documents | reference-document | Markdown, text notes, excerpts, or protocols for agent context. |
| Track presets | track-preset | Saved track configurations to reuse across sessions. |
| Remote data sources | remote-data-source | Named URLs to external data servers such as ENCODE or UCSC hubs. |
| Other files / pasted text | other-file | Any other file type, or freeform text pasted directly into the project. |
The kind tells the assistant what an asset is for.
Importing assets by hand
Click Import to open the editor. It opens on Manual import, titled Import Asset ("Import a project asset for analysis mode and future genome work.").
- Choose the Asset Type.
- Enter a Title (placeholder
Example asset) and, optionally, a Description ("Optional notes about what this asset contains."). - Provide the content:
- For most kinds, click Select File… ("Upload a file into this project for the agent to analyze.") and pick a file from your computer.
- For Remote data sources, enter a Remote URL (placeholder
https://example.org/data-source) instead of a file. - For Other files / pasted text, choose Upload file or Paste text. With Paste text, type or paste into the text area; the app shows the file name it will save the text as.
- Click Save. Reset clears the form.
The new asset appears in the list on the left. Click an asset in the list to open it in the editor. Each asset's ⋯ menu has Delete; click it, then click Confirm within 2 seconds to remove the asset.
Upload size limit
The local backend accepts asset upload requests up to 100 MB (100 × 1024 × 1024 bytes). The file is sent encoded inside the request, which makes it larger in transit, so the largest file you can upload this way is somewhat smaller than 100 MB. For larger data, add a Remote data source or host the file and add it as a remote track.
Importing assets with the import agent
Click Automatic import in the editor to use the asset import agent. This needs the assistant: the Manual import / Automatic import toggle is shown only when the assistant is on (by default, in the desktop app). Without the assistant, only manual import is available.
The Automatic Asset Import form asks for:
- Local files / folders: one filesystem path per line. Files and directories are both supported.
- Remote URLs: one absolute
http(s)URL per line. The agent can inspect HTML pages and import linked assets it finds there. - Instructions for the import agent (optional): guidance about which assets matter or how to organise them.
Click Start import. The agent runs in Asset import mode, a separate chat with its own eight tools for inspecting and importing local paths and remote sources. It does not use the genome tools. When it finishes, the new assets appear in the catalog. See Modes for its tools and limits.
Importing a folder from an Analysis-mode chat
In Analysis mode, you can also ask the assistant in the main chat to look at a local folder and import its contents. It uses project_inspect_local_folder to list what is there and project_import_local_folder to import the files as assets. See Modes and Tools.
Using assets in chat
To attach assets to a message, click the + button in the chat composer ("Tag project asset") and pick one or more assets. Tagged assets are listed with your next message so the assistant knows which ones you mean.
In Analysis mode the assistant reads assets with project_list_assets and project_read_asset. In Genome mode it can list them with project_list_assets. project_list_assets and project_read_asset issue citation tokens, so the assistant's answers can point back to the asset record they used. See Citations.
Importing assets does not add tracks
Adding a file as an asset, even a BigWig or BED under Genomic data files, does not add a track to the genome browser. The asset catalog and the browser's track list are separate. To see a file in the browser, add it as a track:
- by URL with Remote Tracks, or
- by asking the assistant in Genome mode to load it from a URL.
Where assets are stored
With the local backend, each project's assets live in its assets/ folder inside Genie's data directory:
| Path | Contents |
|---|---|
projects/<id>/assets/asset-catalog.json | The catalog: one record per asset with its kind, title, description and source |
projects/<id>/assets/<assetId>/ | One folder per asset, holding its uploaded file and metadata |
Remote data sources are stored as records with their URL; the remote data itself is not copied unless the import agent imports it.